

How To Start Openldap Service In Linux
The Lightweight Directory Access Protocol (LDAP) allows for the querying and modification of an X.500-based directory service. In other words, LDAP is used over a Local Area Network (LAN) to manage and access a distributed directory service. LDAPs master purpose is to provide a set of records in a hierarchical structure. What tin you practice with those records? The best use-case is for user validation/authentication against desktops. If both server and client are set up upward properly, y'all can have all your Linux desktops authenticating against your LDAP server. This makes for a cracking single signal of entry then that you tin can ameliorate manage (and control) user accounts.
The nearly popular iteration of LDAP for Linux is OpenLDAP . OpenLDAP is a gratis, open-source implementation of the Lightweight Directory Access Protocol, and makes it incredibly like shooting fish in a barrel to become your LDAP server up and running.
In this three-part series, I'll be walking y'all through the steps of:
-
Installing OpenLDAP server.
-
Installing the web-based LDAP Business relationship Director.
-
Configuring Linux desktops, such that they can communicate with your LDAP server.
In the finish, all of your Linux desktop machines (that take been configured properly) will exist able to authenticate confronting a centralized location, which means you (as the administrator) have much more control over the management of users on your network.
In this first slice, I'll be demonstrating the installation and configuration of OpenLDAP on Ubuntu Server 18.04. All y'all will demand to make this work is a running instance of Ubuntu Server xviii.04 and a user account with sudo privileges.
Let'due south get to piece of work.
Update/Upgrade
The first thing you'll want to practise is update and upgrade your server. Exercise note, if the kernel gets updated, the server will need to exist rebooted (unless you have Alive Patch, or a similar service running). Because of this, run the update/upgrade at a time when the server can be rebooted.
To update and upgrade Ubuntu, log into your server and run the following commands:
sudo apt-get update sudo apt-get upgrade -y
When the upgrade completes, reboot the server (if necessary), and become set up to install and configure OpenLDAP.
Installing OpenLDAP
Since we'll be using OpenLDAP as our LDAP server software, it can exist installed from the standard repository. To install the necessary pieces, log into your Ubuntu Server and issue the following command:
sudo apt-get instal slapd ldap-utils -y
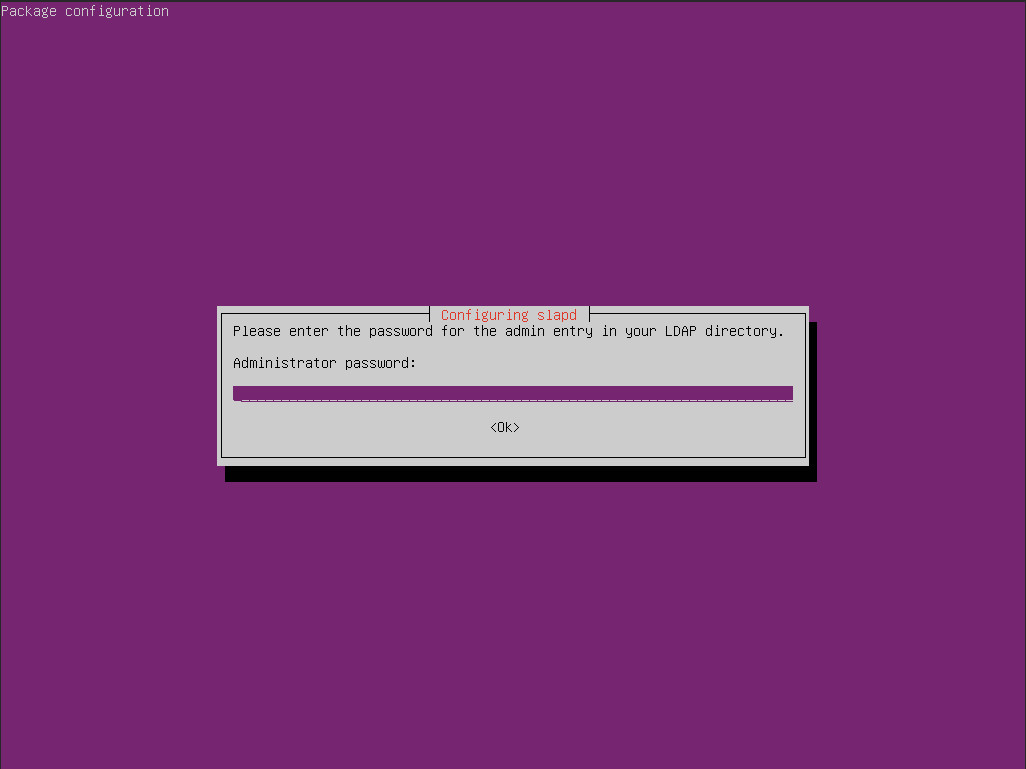
During the installation, you'll be offset asked to create an administrator password for the LDAP directory. Type and verify that password ( Figure ane ).
Configuring LDAP
With the installation of the components complete, it's time to configure LDAP. Fortunately, there's a handy tool we can use to make this happen. From the terminal window, consequence the control:
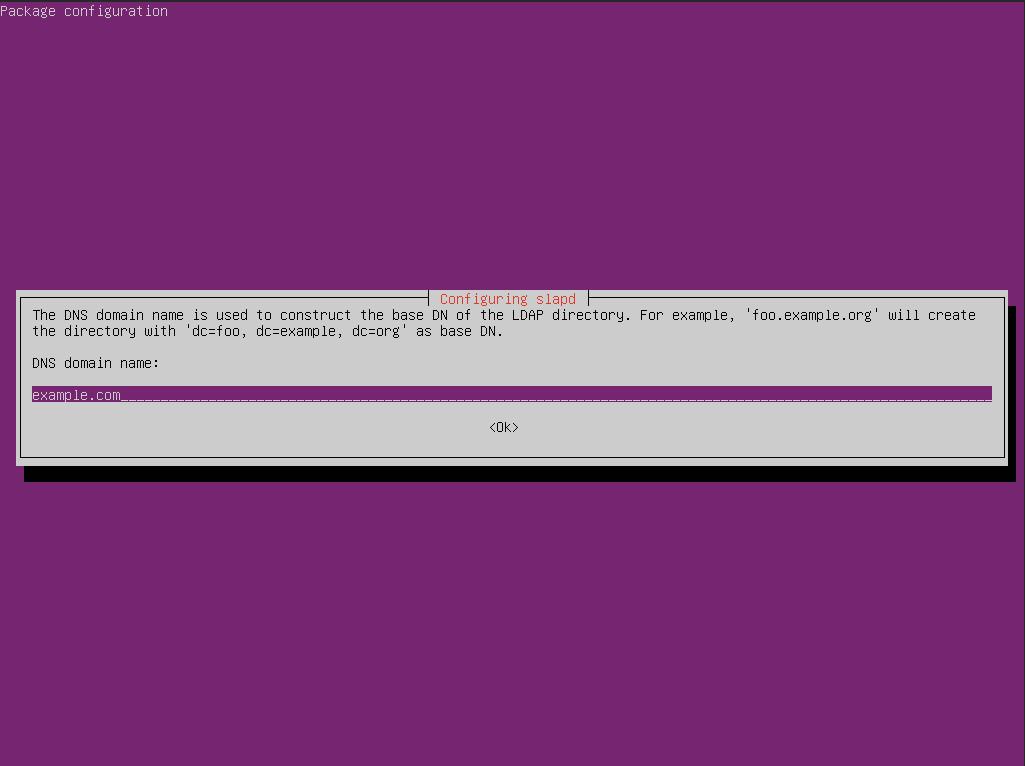
sudo dpkg-reconfigure slapd In the first window, hit Enter to select No and continue on. In the second window of the configuration tool ( Figure 2 ), yous must type the DNS domain name for your server. This will serve as the base DN (the point from where a server volition search for users) for your LDAP directory. In my case, I've used example.com (you'll want to alter this to fit your needs).
In the next window, type your Organizational name (ie the proper name of your visitor or section). You volition and so be prompted to (once once more) create an administrator password (you can apply the same 1 as yous did during the installation). Once you've taken care of that, you'll be asked the following questions:
-
Database backend to use – select MDB .
-
Exercise you desire the database to be removed with slapd is purged? – Select No .
-
Motion former database? – Select Yeah .
OpenLDAP is now ready for data.
Adding Initial Data
Now that OpenLDAP is installed and running, it'southward time to populate the directory with a bit of initial information. In the 2d piece of this serial, we'll be installing a web-based GUI that makes it much easier to handle this job, just information technology'due south always good to know how to add information the manual way.
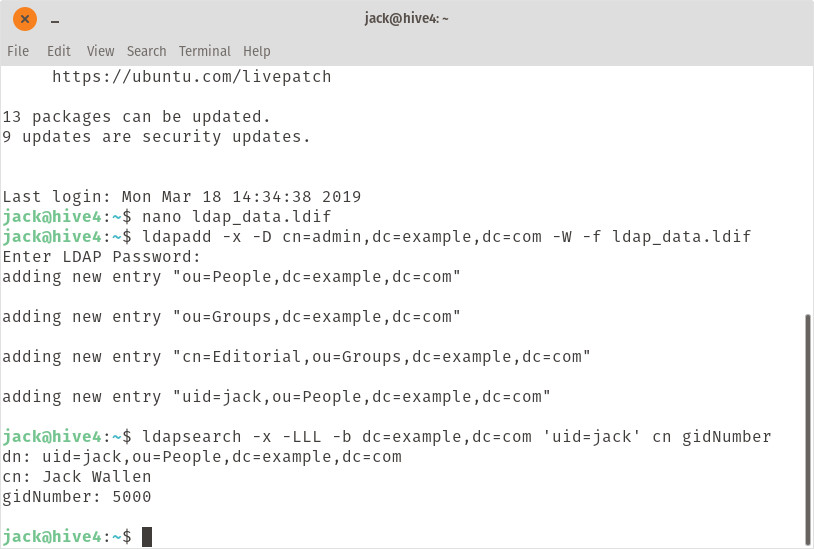
1 of the all-time ways to add information to the LDAP directory is via text file, which tin can so be imported in with the ldapadd command. Create a new file with the control:
nano ldap_data.ldif In that file, paste the following contents:
dn: ou=People,dc=example,dc=com objectClass: organizationalUnit ou: People dn: ou=Groups,dc=EXAMPLE,dc=COM objectClass: organizationalUnit ou: Groups dn: cn=DEPARTMENT,ou=Groups,dc=Case,dc=COM objectClass: posixGroup cn: SUBGROUP gidNumber: 5000 dn: uid=USER,ou=People,dc=Case,dc=COM objectClass: inetOrgPerson objectClass: posixAccount objectClass: shadowAccount uid: USER sn: LASTNAME givenName: FIRSTNAME cn: FULLNAME displayName: DISPLAYNAME uidNumber: 10000 gidNumber: 5000 userPassword: Password gecos: FULLNAME loginShell: /bin/bash homeDirectory: USERDIRECTORY
In the higher up file, every entry in all caps needs to be modified to fit your company needs. Once you've modified the above file, salvage and close it with the [Ctrl]+[ten] key combination.
To add the information from the file to the LDAP directory, issue the command:
ldapadd -x -D cn=admin,dc=EXAMPLE,dc=COM -W -f ldap_data.ldif Remember to alter the dc entries (Instance and COM) in the above command to friction match your domain name. After running the control, you will be prompted for the LDAP admin password. When you successfully authentication to the LDAP server, the data will exist added. Yous can so ensure the data is there, by running a search like so:
ldapsearch -x -LLL -b dc=EXAMPLE,dc=COM 'uid=USER' cn gidNumber Where EXAMPLE and COM is your domain name and USER is the user to search for. The command should report the entry you searched for ( Figure 3 ).
Now that you have your first entry into your LDAP directory, you can edit the higher up file to create even more. Or, you tin look until the next entry into the series (installing LDAP Account Manager) and take care of the process with the web-based GUI. Either way, y'all're ane pace closer to having LDAP authentication on your network.

Source: https://www.linux.com/topic/desktop/how-install-openldap-ubuntu-server-1804/
Posted by: dickwaye1987.blogspot.com
0 Response to "How To Start Openldap Service In Linux"
Post a Comment